Benjinx's Development Blog
Capstone Blog Posts
by Benjamin Campbell
Senior Capstone: Blog Twelve – Postmortem
Well it’s over but I still should explain my full experience at Champlain College.
What Have I Accomplished In My Game Development-or Not Accomplished?
I feel like I set out at Champlain College wanting to learn how to program much better than I previously came in knowing, I wanted to learn how to work on a Game Development team, and how games were really made. I feel during my time here I’ve come a long way I started by not knowing how to do much programming at all and in my first year I was able to blow my own thoughts out of the water about what I ever would have learned here. During my second year here we finally came together to do group projects more so and I learned to work with other programmers very well and use that knowledge to then progress into the next semester to be able to work on my first full Game Development teams consisting of all roles (Programmer, designer, artist, and producer). Even at this point I was amazing by how far I’d come and what I’d learned. Since then I’ve continued to further my knowledge in programming learning different things such as how to create AI that would work well in games, Graphics Programming, and even networking for games. Which have all contributed to making me a much better asset my my teams I’ve worked with to create different games through my time here at Champlain College.
What Have I Done During My Time At Champlain College, How Have I accomplished This, And What Does It Mean For My Future Efforts?
I’ve done AI, Networking, Graphics, and game play programming while here at Champlain College. On top of that I originally learned how to program when I first came in since I had very little knowledge about what I was doing. This put me in a very good place to be able to handle what is coming up in my future. I feel ready to handle the real world and take on any programming assignments I will be given in a real programming job.
On top of all of this I’ve learned how to be a good work partner. I’ve had my ups and downs with different programming/game development partners and sometimes it’s very hard to handle and keep your cool but I’ve always managed to accomplish everything I’ve set out to do. So I’d say I’ve learned how to handle people, how to work with them in a decent manor and how to be prepared to work on a team in the future.
All of these experiences have made me ready to take on extra classes in my final semester here, I’m taking an extra Graphics Programming class since I very much enjoy Graphics Programming and I want to further my studies in Graphics while I still have the opportunity to do so.
My Experiences Of The Semester, And What They Mean To Me, The College, And To Society
The future is a scary topic to some including myself. I haven’t always known what I wanted to do. I came into Champlain College as undeclared just knowing that I loved programming and I loved games. I had no idea coming in here that this is where I would be 5 years from then. I came in knowing nothing and now I know more than I could have ever imagined I would have learned back during my freshmen year. I feel my experiences here have made a decent impact since every year following my class they’ve made huge changes to the curriculum for the better. I don’t think it was just me who made those changes but I feel my class as a whole has made the school much better in the following class years. Knowing this I feel like the future is ripe and ready for the taking for all of us. We’re a very good class of Game Developers and I feel if everyone continues to strive for what they believe is the best decision then the industry is going to change widely from all of our knowledge and development.
Overall I’ll miss Champlain College. This was one hell of an experience. I’ve learned so much about myself, the school, my friends, and the community during my time here and I wouldn’t trade this experience for anything else. I loved my time here and I’ll always cherish it.
Senior Capstone: Blog Eleven – The Calm Before The Storm… Actually this is a Full Blown Hurricane
The Final week of capstone, ahhh what a relief. Nope, it’s a nightmare. There was so much to handle this week… the following is just the beginning of what needed to be done by me.
List of Fixes This Week:
– No core draining(done), no defender arrow or panel.
– “Team B run you are attacking or defending”, remove Team B part.
– Core w/ arrow in bottom left no panel.
– Drone has energy bar, show energy bar for it center bottom, Left to right drain.
– Reassess attacker/defender UI being active during the right time.
– 3 bubbles under timer, when team wins color them accordingly.
– Button bottom corner (RT) – Jetback, Gray out when unusable, normal when usable.
– Client has energy bar during setup phase.
– Remove canJump/canJetPack panel from attacker UI.
– Client doesn’t have energy bar during defender phase, and still has the tracking orb.
– Client bugs out saying no reference to an object with the bar.
– Check the timers/get them to show the time for each player correctly/Attacking time show on both.
– Red semi transparent sphere is activated in center of laser (TINY, SUPER TINY).
– Setup (red unactivated/Green activated) (environment traps).
Summary:
This is a much harder week to explain so I’ll just sum up this week with the list above and an overall explanation. We basically needed a lot of bug fixes/changes to the UI based on player feedback and our own testing. We needed to update when certain panels showed up and vanished. We needed to create a much better energy bar that showed off the amount of energy left for the drone while defending. We also needed to cut out a few things from last week that I had worked on thus leaving us with the list above.
Senior Capstone: Blog Ten – …You Guessed It! MORE UI!
Updates to the attacker/defender panels
We essentially removed the defender panel and replaced it with an energy bar that indicates how much power they have left to charge their traps with. They can go recharge their power but we decided to not have an indicator for the defender about where the player is on the map currently to create a bit of a harder atmosphere for the defender.
Should We Stop & Ask for Directions? NO! We’re Not Lost!
We decided to change up the arrow form last week and hopefully have it work better. We started by changing it to be in the bottom left and have an orb at the center that starts filled and drains based on the time left and would reward the player based on their time with the amount of cores corresponding with the time they finished it in. For the arrow we want to keep the same arrow but have it rotate around the orb to keep it similar to the original arrow but having a new aesthetic to it.
Senior Capstone: Blog Nine – UI, UI, UI
Which Way is Up?
This week we discussed needing an arrow for direction on both the attacker and defender. We decided to create an arrow for the attacker that pointed to the object based on X and z rather than take into account the y direction. WE wanted to still leave some difficulty thus why we decided to leave out y as a direction and not give them the full information about this. This was rough I started by attaching a gameobject to the player and using the LookAt function to try and get the arrow to work correctly but it ended up being a lot rougher than expected. I’ll continue to work more on this next week.
Extra! Extra! Read All About It!
(Okay so besides the fact that I attempted to write this section in code, then connected to to the actual code. It might help if I explain what’s going on here just a little bit). We start by creating two Dictionaries. One that contains the text for each trap, and one that contains the names in bold of the traps. Next we head on down to void TrapInfo() where we grab the current trap being placed or activated and we then check to see if it’s null (aka no trap is selected) and we then strip the name from the game object and use a Split function to remove the word “(Clone)” from the Instantiated prefab. We then change the names to bold by checking if the trap exists in the dictionary. Following this we set the trap text equal to the associated trap and add a cost to it via getting the trap cost.
void trapInformationPanel()
{
    if (informationAboutTraps == isNeeded)
    {
        _trapInfoPanel = Instantiate(panelPrefab, transform.position, transform.rotation);
        handleTrapText();
    }
}

private Dictionary<string, string> _trapText = new Dictionary<string, string>()
{
    {"spring", "Pushes attacker away"},
    {"gateTrap", "Gate is raised"},
    {"laserTrap", "Temporarily stuns attacker"},
    {"cage", "Pops up from the ground and traps attacker"},
    {"grapple", "Locks attacker in place"},
    {"lanesTrap", "Slows down attacker"}
};

private Dictionary<string, string> _trapNameBold = new Dictionary<string, string>()
{
    {"spring", "<b>Spring</b>"},
    {"gateTrap", "<b>Gate</b>"},
    {"laserTrap","<b>Laser</b>"},
    {"cage", "<b>Cage</b>"},
    {"grapple", "<b>Grapple</b>"},
    {"lanesTrap", "<b>Quicksand</b>"}
};

void TrapInfo()
{
    GameObject currentTrap = _snapToGrid.CurrentTrap;
    GameObject currentEnvTrap = _snapToGrid.CurrentEnvironmentalTrap;
    string trapName = "";
    string trapText = "";
    string trapNameBold = "";

    if (currentEnvTrap == null)
    {
        if (currentTrap != null) // used in case null obj
        {
            trapName = currentTrap.name;
            string[] modTrapName = trapName.Split(new string[] { "(Clone)" }, StringSplitOptions.None); // used to remove (clone)
            trapName = String.Concat(modTrapName); // put array back in a string
        }
    }
    else
    {
        trapName = currentEnvTrap.name;
        string[] modTrapName = trapName.Split(new string[] { "(Clone)" }, StringSplitOptions.None); // used to remove (clone)
        trapName = String.Concat(modTrapName); // put array back in a string
    }

    if (_trapText.ContainsKey(trapName))
    {
        trapText = _trapText[trapName];
    }

    if (_trapNameBold.ContainsKey(trapName))
    {
        trapNameBold = _trapNameBold[trapName];
    }

    if (trapName != null)
        _trapInfoName.text = trapNameBold;

   _trapInfoCost.text = "Cost: " + _snapToGrid.GetCurrentTrapCost().ToString();

   _trapInfoText.text = trapText;
}
Senior Capstone: Blog Eight – The Beginning of U & I
Hello! Friends and fans of our amazing game! (We still haven’t decided on a name… I think we change it at least twice a week). My newly assigned tasks for the next few weeks are going to be UI since it’s a vital part of our game, due to the fact that we have so much going on.
List for the Week:
- Create a Timer
- Number of Traps
- In-Game UI
Since we’re going to be having a lot of UI elements I found it appropriate to implement a UIManager that would handle most if not all of the UI in the whole game.
I’m late, I’m late for a very important date. No time to say hello, good-bye, I’m late, I’m late, I’m late!
No one ever has enough time for anything, especially Game Developers. This being said it would probably be a great idea for our players to know how fast they’ve completed the level especially since our game is a time trial to see which team is faster.
Implementation of a timer is pretty simple, I made a very basic UI panel and text to hold the timer information. Moving on over to the UIManager, we implement a few variables, current time, start time, and a text variable to hold our UI text. Next we just have current time be updated by Time.deltaTime and then update the UI text to hold the newly updated time.
#Traps
#Traps aka Number of Traps. Since we wanted players to have information about the amount of traps they can place we decided to start with a limit of 5 and just made a very simple UI element to indicate how many traps they had remaining to place.
Heads Up!
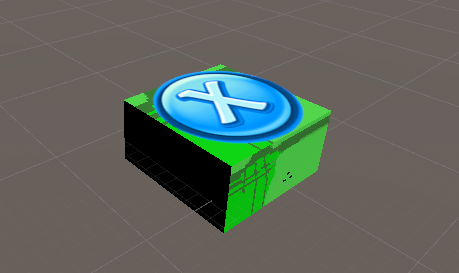
Many games such as Borderlands and The Division use an in-game UI to make the game more visually appealing. Our group discussed this idea and we wanted to try and implement at least one UI element on the character. It was actually quite easy to get this type of UI implemented! Unity has an option to change the UI to world space thus we can move the object around the world space and position it as desired, such as this X button on our cubes back below.
Senior Capstone: Blog Seven – We Should Have Listened When They Said Networking was AWFUL
Well last weeks merge of our two prototypes was awful, it just snowballed, and then got harder from there. We had to spend a bit more time after last weeks merge just tweaking out a few bugs here and there that hadn’t been cleaned up last week. Since we have decided we want objects in our environment to move and rotate we needed a general script that we could attach to any object in the scene and assign it both a rotation and a translation amount.
Time, Space, and Gameobjects
Starting off on this Moving Environment I knew it was going to have to be networked rather than just something local to make sure there wasn’t a deviation of positions or rotations. I wanted to make sure that the server would handle all of the objects and update them correctly and just pass that data of transforms across to the client to just update positions.
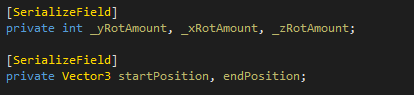
I started by just setting up some variables to grab rotation amounts, and a start/end position for the desired game object.
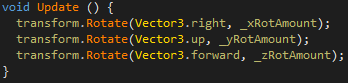
Next I needed to actually change the rotations.
Finally we needed to actually move the object based on time and use lerp to have the object move smoothly. Below is how I handled the gameobject movement entirely.
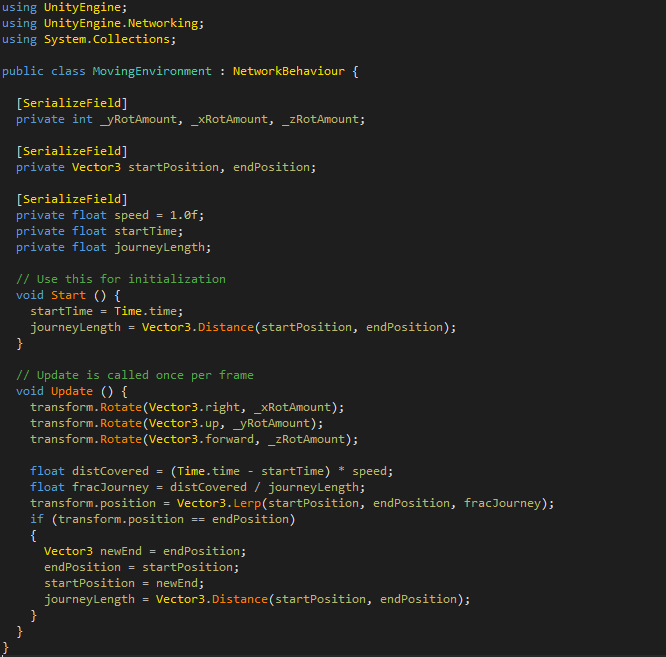
All we have to continue to add later is a patrolling option if desired.
Senior Capstone: Blog Six – The Merge
So to begin with here’s my advice to anyone reading this who’s doing networking… Don’t separate your networking out from your main project… merging the networking into a half done project is a nightmare. Since my programming partner and I wanted to prototype our mechanics (mine being the networking) separate from each other this was a nightmare to combine the networking back in with mechanics and systems already implemented. We ended up spending a very long 5-6 hours together just trying to get each component re-set up correctly and trying to implement our separated projects.
There wasn’t a whole lot more this week besides just merging the prototypes back together but if you do separate projects make sure you’re ready for a headache and basically rewriting systems to handle the changes of how the server and client are going to interact and handle all of the data being passed around.
Senior Capstone: Blog Five – Networking Continued
This week I continued to primarily work on the networking. The week started with having a better understanding of identifying the localplayer which I did by simply changing the color of the game object to show the difference between the local player and any other players connected to the network. Next I implemented Health across the network to better understand how the server would handle variables and how to correctly use SyncVars and I implemented a basic shooting mechanic for the player with collision to remove health to learn more about instantiating objects on the server and having them be handled across the network.
Again I was still following most of the guide from: https://unity3d.com/learn/tutorials/topics/multiplayer-networking
Colors Galore
Identifying the local player can be a very handy tool to handle different actions on each client. I did a basic test of this by just implementing a simple material color change based on a function call premade in NetworkBehavior (which is what any scripts inherit from instead of monobehavior in networking).
public override void OnStartLocalPlayer()
{
    GetComponent().material.color = Color.blue;
}
As you can see it isn’t rather difficult to handle local player identification but it’s important to know this functionality exists.
An Apple a Day Keeps the Doctor Away
Implementing the health system was actually a lot easier said then done. First was creating a health script for the player that held a max health, current health, and had a function to adjust the health called TakeDamage. I then accessed the OnCollisionEnter for a bullet script (Which will be explained more in the next section) and was able to call the TakeDamage function from the health script on the player and modify the health as needed. The only other changes we needed to make to have it networked was the make the current health a [SyncVar] and add a simple if statement (below) to the TakeDamage function that would allow the server to handle the damage.
if (!isServer)
{
    return;
}
Pew, pew, pew
Previously stated I mentioned utilizing the OnCollisionEnter function on a bullet script. So what is this bullet script? Well essentially it starts with creating a Fire() function in a script attached to the player and having it instantiate a bullet prefab that has this new bullet script on it which will then cause it to interact with the player, or another player in this case, and cause them to lose health.
Below you can see what all of this looks like combined together!
Senior Capstone: Blog Four – Reconsideration & Reprototyping
At the start of this week we presented that we were going to go with the game we had been prototyping nicknamed Footsteps. I continued some development and prepped for our presentation to start with. Our presentation went well, but after feedback from lots of different individuals we quickly changed our minds and what our focus was going to be. We redid our presentation the same week for the ACTF game and finally were approved to Deep Dive for this game, which meant we could start to fully focus and develop our newly chosen game!
Our Chosen Game
This is probably a good time to better explain our chosen game for everyone to have a better understanding of the concept. Currently our working name for this project is Asymmetrical Capture the Flag (ACTF). The idea is to have two teams with two players on each, totaling four different players. Each of these teams is assigned a role, that we are currently calling Attacker and Defender. It starts with each team setting up different types of traps on two separate maps to defend and protect their “Cores” which are the flags. After the setup phase Team A will attack Team B’s base. This attack phase is timed and will be compared to the opposing teams final time to determine the winner. While Team A is attacking Team B’s base, Team B will be able to fly around as Drones and activate the different traps around the map to attempt to slow down Team A. Once Team A has completed their Attack phase, Team B will attack Team A’s base. Once this is completed as stated before the times are compared and the faster team is the winner.
This Weeks Development
For this week we started to break down what we needed for our newly selected game. I took up the opportunity to start on the Networking for our game in Unity since none of us had any experience using the networking in Unity. Since I have minimal networking knowledge about networking and none with the networking in Unity I started off doing a lot of research into different guides as well as the Unity Manual to get a very basic setup of the networking going.
For the most part I followed the guide here: https://unity3d.com/learn/tutorials/topics/multiplayer-networking
I started off using the default Unity networking implementation which consists of a Network Manager Component and a Network Manager HUD Component. They just need to be attached to an empty game object I was calling a NetworkManager, so that I would have the networking implementation separated from any of the other game systems. The Network Manager is mostly set up to start with but I had to create an offline scene and online scene. I created a lobby scene, which is the default starting screen as well as the offline scene, it holds the NetworkManager and carries it over to whichever level we are currently having the players play aka our Scene1 which was just a testing scene for networked play. Below is the NetworkManager and the Object it is attached to as seen in the Lobby Scene.

Using this system it made it easy to start creating a player prefab and have it implemented into the online scene. As you can see above the Network Manager provides a default function to spawn a Player Prefab. I was able to get this working and have two clients connect with their players spawning correctly.
Learning to Walk Before You Can Run
My next action was the get some movement on the players and see the player movement across the network on both ends. Below is the basic movement script I created which allows for the local player to move itself.
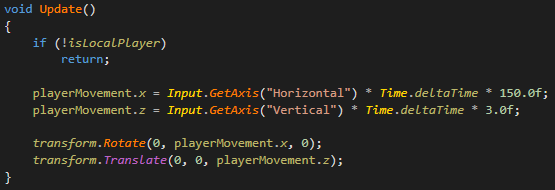
The only other thing after this that we had to do to see the networked movement is to add a NetworkTransform component to the player prefab. It synchronizes the GameObject’s entire transform across the network.

As you can see on the left, I’m controlling the character and on the right you can see the movement being passed across the network!
Senior Capstone: Blog Three – Final Decision
Ahh, the second week working on our prototypes. I started this week by continuing to work on the fireflies game.
The main idea for the combined fireflies game came from a bunch of different ideas we originally had for games. It started with the what we were calling Altered Reality which was your character wandering in the woods in the dark with a light aura surrounding the character. It was suppose to be a survival game and resource oriented (your light meter). The main purpose was to explore the unknown and encounter different scary creatures that don’t directly affect your character but start to alter or change the game play/reality around your character. The second game that fireflies came from was the game we had labeled fireflies & Lanterns. This was based around being a 3D action platformer where you had to manage your light resource and light different lanterns to summon forest spirits. The third game was projectile light, where you had different challenges/puzzles and you would throw light somehow and it would freeze objects when it was in the area of the light.
We combined what we believed to be the best parts of all three of these games and came up with the game we’re currently calling Footsteps. This is a game where you are wandering around in the dark with a light aura around you that increases with the more light resource that you collect. You can also place these resources in lanterns around the map to illuminate the area. Now there are these footsteps that you can visually see to represent if a player were hearing them around the map. These can either be friendly or dangerous creatures. When they either encounter a lantern or your character with the light aura turned on they freeze and if they are enemy creatures they will attack you. The main goal is to freeze them and back away quick enough that they do not attack you. While this is going on you’re trying to collect as many light resources and meet good creatures so that you can save the forest before the angry villagers destroy the haunted and scary woods.
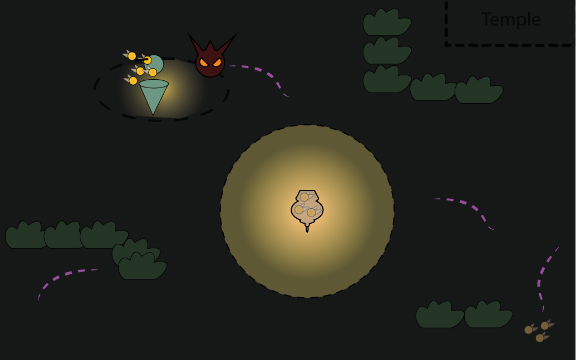
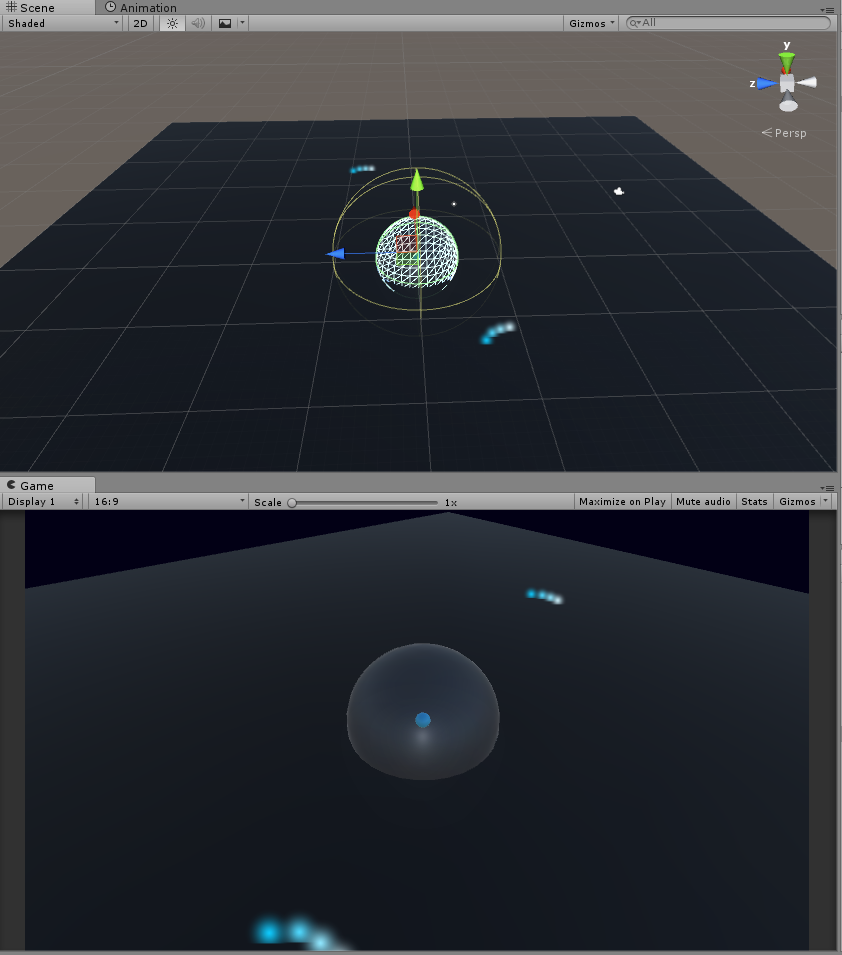
I started out this prototype by trying to get the lighting around the character working in a way that would visually show the light enough for the player to understand the area that was being lit which can be seen below as a full sphere that is lit with lighting on the inside. Now the glowing particle effects that you see around the scene are to represent these footsteps that the players can see. These are the footsteps of the enemy creatures and the good creatures. They will not be revealed until your light radius intersects with them. At this point it’s about backing away from the evil creatures to avoid them or collecting the good creatures since they are your light resource.
Thus we started the QA testing where each person went and tested two of the games each to try and get as much feedback as possible. I tested the two games I was assigned with my roommates and brought the feedback to our end of the week meeting. When met at the end of the week. We had to make a decision about which game we wanted to try and continue forward with. We sat and discussed the pros and cons of each game we had prototyped. And finally decided we were going to go with…. Drum roll Footsteps!
Senior Capstone: Blog Two – Ideas, Ideas, Ideas
After presenting these different ideas we took all of the feedback we had obtained and sat down together as a team to decide upon which games would be more interesting for us to work on together. We used this information to work on the games that needed more development of the concept but we then started prototyping some of the more flushed out games. I was assigned to start prototyping the game we were calling Fire Tornado. While this was happening Eva started working on the game Layers prototype and David was working on the Lemons prototype. We had decided that it wasn’t going to be in our best interest to cut from 9 games down to 3 or 4 in a week so we’ve decided to take two weeks before we challenge the next stage.
The idea behind the fire tornado game was to use the sticks of a controller as the main controls. One stick would control the speed/distance the tornado would spin and the other would control the direction that the player was moving in. Shown better below.
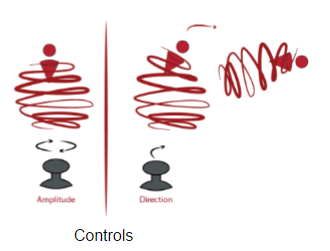
The objective was the use different fans to platform the level and unfreeze objects or melt different objects. I started by getting the prototype to function correctly off the stick movement for the amplitude.

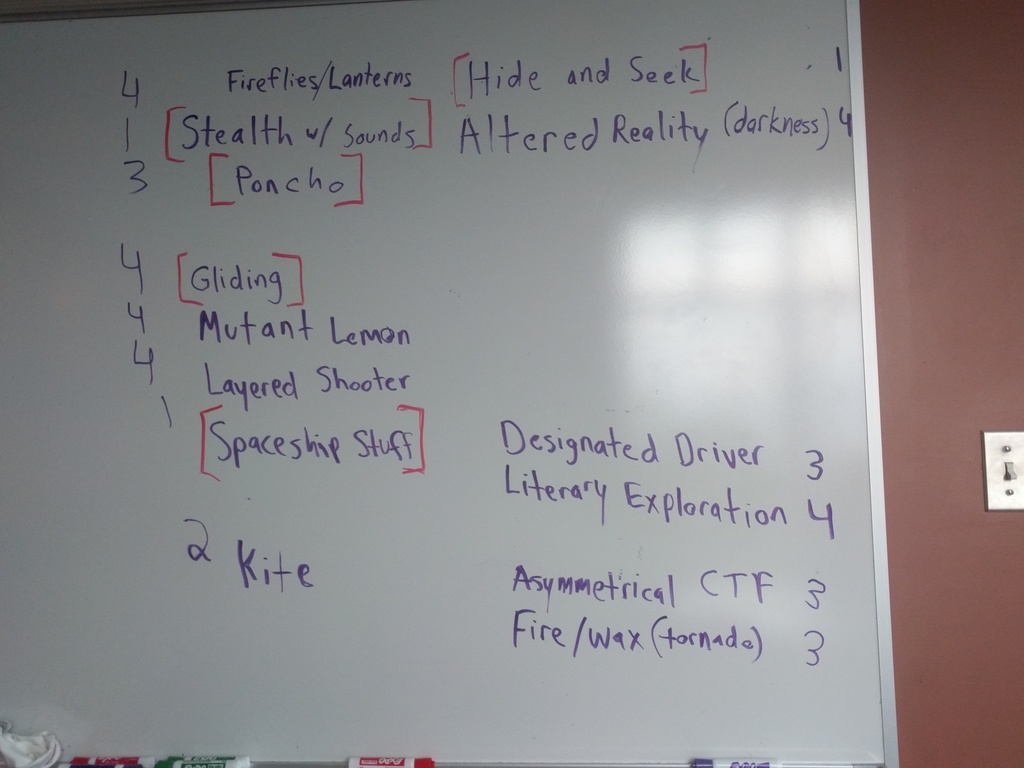
After working for a week we sat down and had a long meeting discussing the pros and cons of each game, showing off the different prototypes we had worked on, and what we saw in the future for each of these games. It took us ages with discussion about why we liked each idea but eventually we cut the list down to four different games.
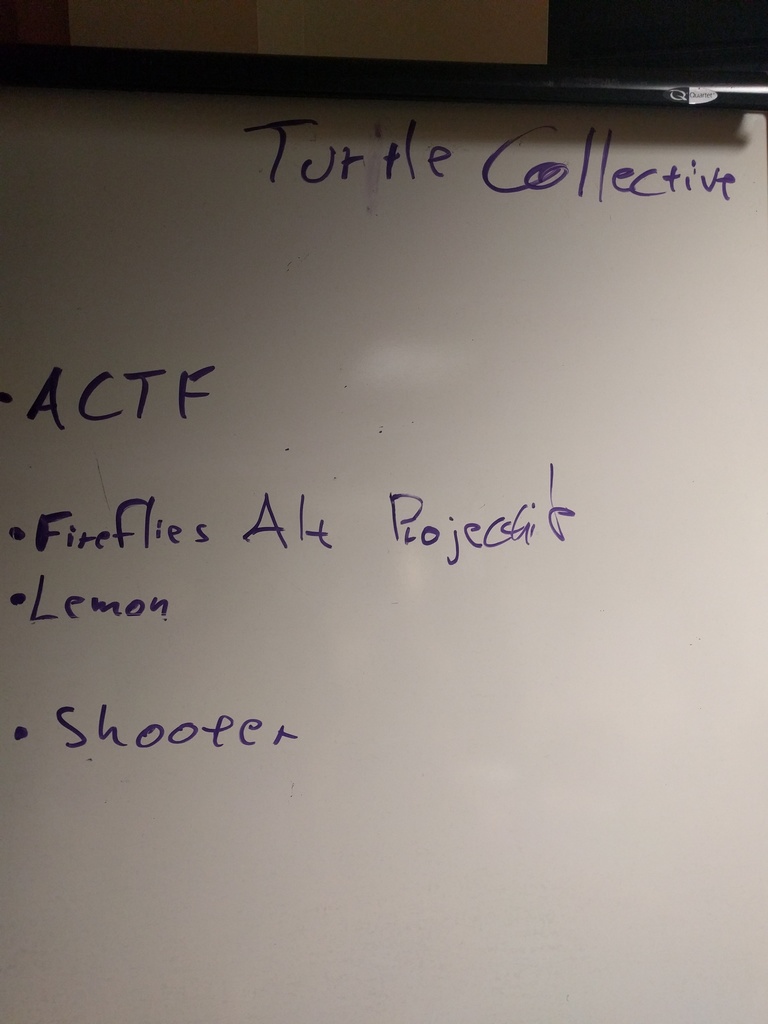
This was also where we came up with our teams name, Turtle Collective!
At this point we needed to start working on these 4 ideas and flushing them out as much as possible. I picked up the Fireflies game and started to work on the prototype of it nearing the end of the week so we could get everything done by next week and be able to QA test all of our different prototypes as well as have time to put our presentation together.
Senior Capstone: Blog One – In the Beginning
Finally the summer is over and my final year of school is here. It’s time to start on the year long production class rather than just one semester! For this class I was randomly assigned into a team of four people, a designer, an artist, another programmer, and myself. Prior to starting the class we did a meet and greet over google hangouts since I didn’t know any of these fellow students.
We started off the semester by having to come up with as many ideas for different games and mechanics as we could, that we thought were innovative and unique. We came up with over 20 different ideas to start with, but we needed to narrow it down so that we would be able to present the different ideas to our classmates and professor. We cut our ideas down to 9 different types of games and 5 different types of mechanics we liked.
We took these ideas to class and presented them in hopes to get as much feedback as possible. Using this feedback we ventured off into week two to decide upon cutting our games down to a minimum of 3 to be able to prototype and present to the class.
tags: c# - unity